


One of the cool things you can do at WHUS is produce “talk content”. This can include PSAs, podcasts, radio shows, or even a fourth thing. The techniques you will learn in this guide can be applied to production of any category of talk content.
Step One: Planning
This step is not always very fun but it makes the rest of the process much easier. You should figure out what you are going to say before you say it. For long-form content, like podcasts or radio shows, a simple outline should suffice. For short-term content, like PSAs, it’s best to write every word you say, because you only have 30 seconds to say those words (it is better if they are good words).
Step Two: Pressing the “Record” Button
Before you start talking, you need to press a record button somewhere. This can be on your phone or audio recorder. However, if you want your content to sound like it was recorded on a WHUS-grade microphone, it is better to record using a WHUS-grade microphone. You can find WHUS-grade microphones in WHUS studios. If you want to use these WHUS-grade studios, get in contact with someone at WHUS (for example, the Talk Director, who is reachable at talk@whus.org).
If you followed the procedure so far, you should be inside of a WHUS studio. Now, you have to set the studio up so that if you talk into a microphone, your voice will be recorded. This requires you to use the mixing board. You can learn more about the mixing board at a WHUS training session. The most important thing to know right now is that your microphone (labelled OPER. MIC) should be turned on and up to about the red line. If everyone is using the studio responsibly, the mixing board will already be in the correct setting. Here are examples of how the mixing board should look:
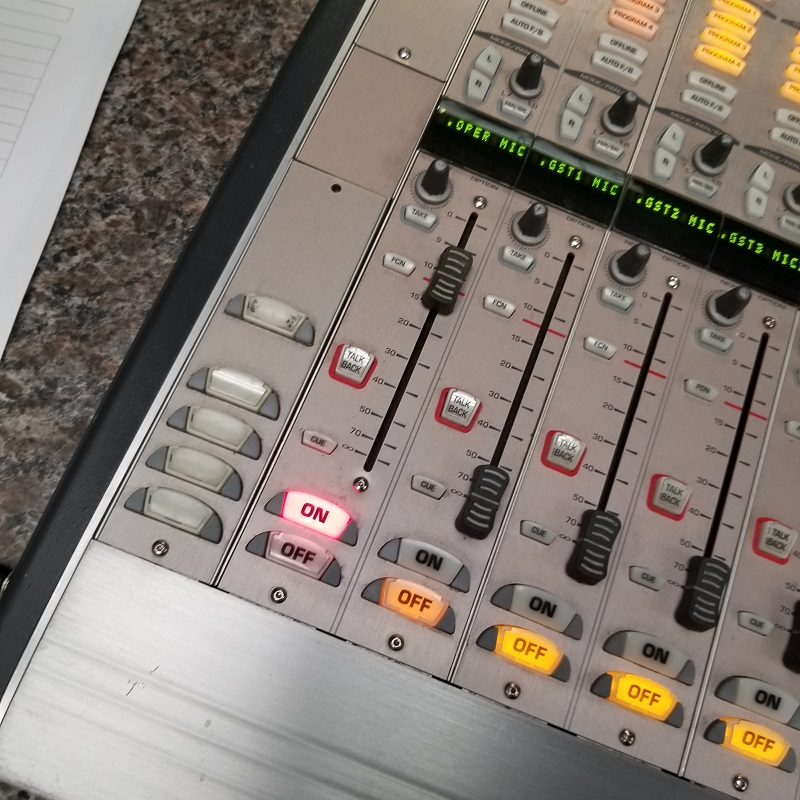
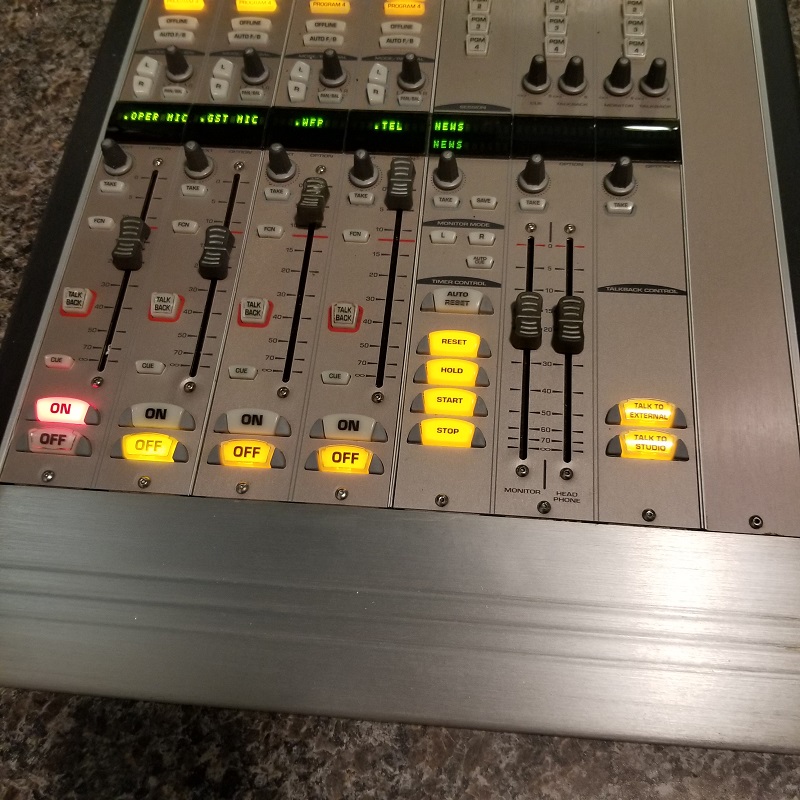
To set your microphone level appropriately, you should first set your headphone level to a comfortable level. Then, turn your microphone level high enough so that your voice is audible, but low enough so that the background noise of the room is not noticeable, and so that your voice is not peaking, even when you say loud syllables.
You are almost ready to hit the record button. All you need to do now is find a record button. Luckily, there is one hidden in a program called “Adobe Audition”. You can open Adobe Audition by going on the computer and clicking on Adobe Audition.

You are now very close to having a record button to press. To get there, we should create a new audio file in Adobe Audition. You can do this by pressing File>New>New Audio File. Now you will see a dialog box. You should make it look like this:
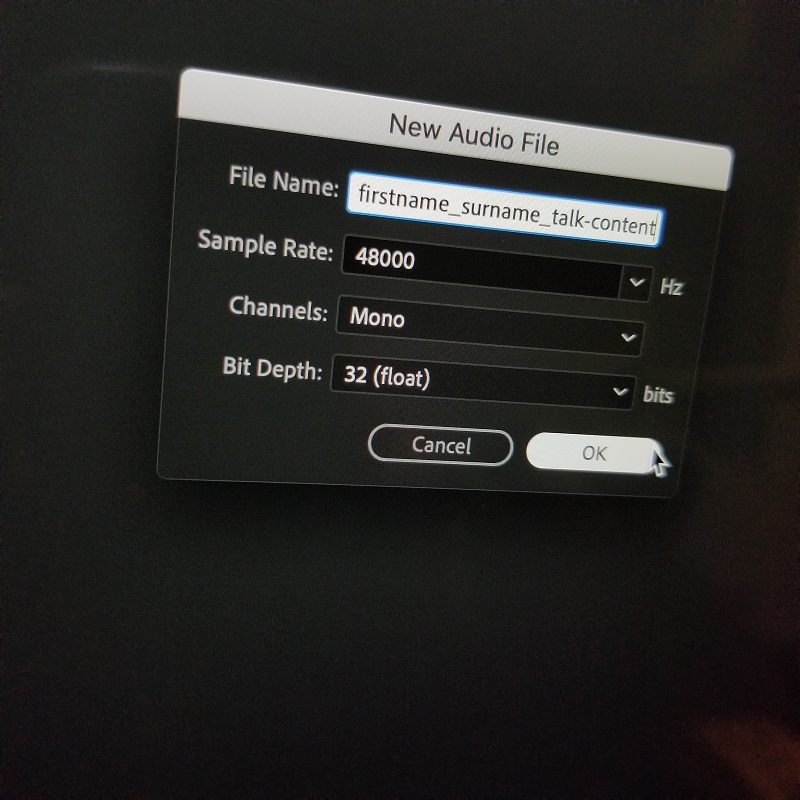
Obviously, you can change the filename to something more relevant to your talk content. It is important, however, that the sample rate be 48000. You can change the channels from Mono to Stereo, but such a change would not help you very much. Keep the bit depth at 32 (float). After pressing OK, you will finally have a record button to press.
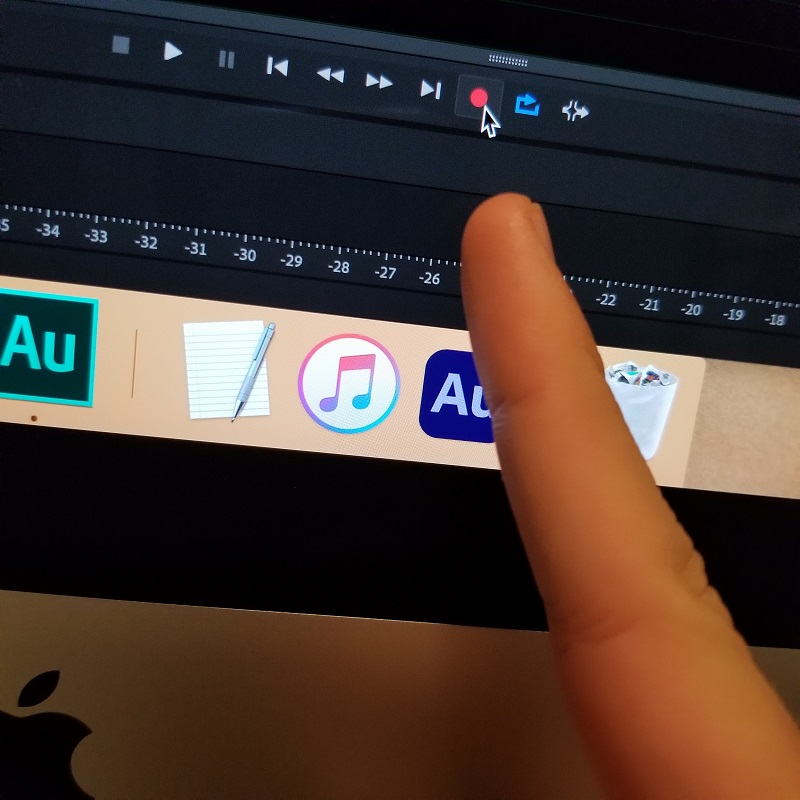
Don’t press it yet. Instead, enable input metering so you can see if the computer is actually hearing your microphone.
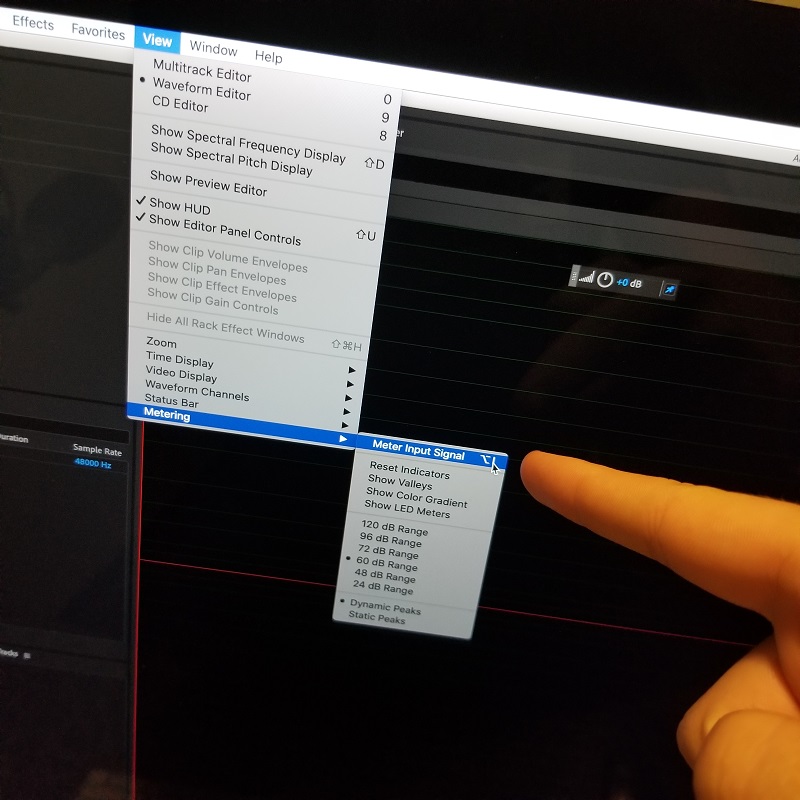
Meter Input Signal
Now, when you talk into the microphone with your normal speaking voice, your screen should look like this:
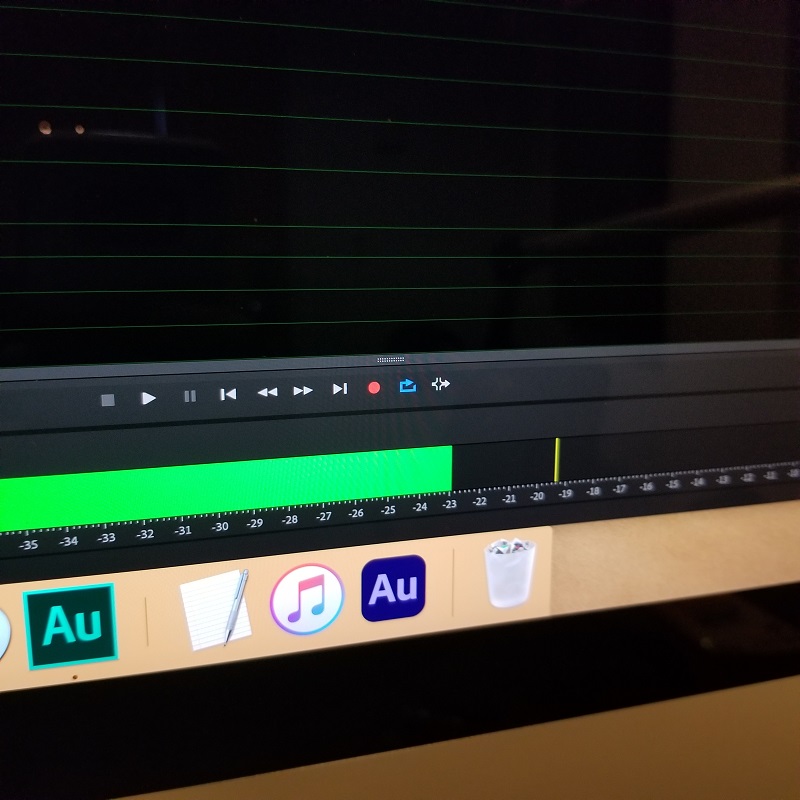
The yellow line shows how loud your voice got when it was at its loudest in the last second or so. Here is what it will look like if you have your microphone set too loud:
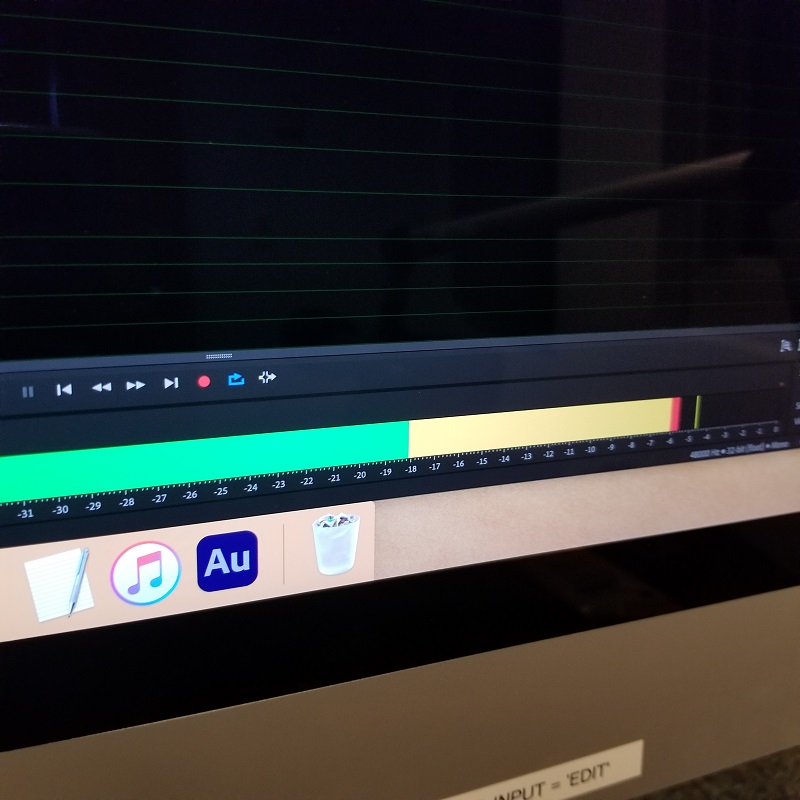
You can tell it is too loud because the meter goes all the way into the red zone. It’s a good idea to avoid the yellow zone, too.
Okay, now you can press the record button.
Step Three: Speaking (talking)
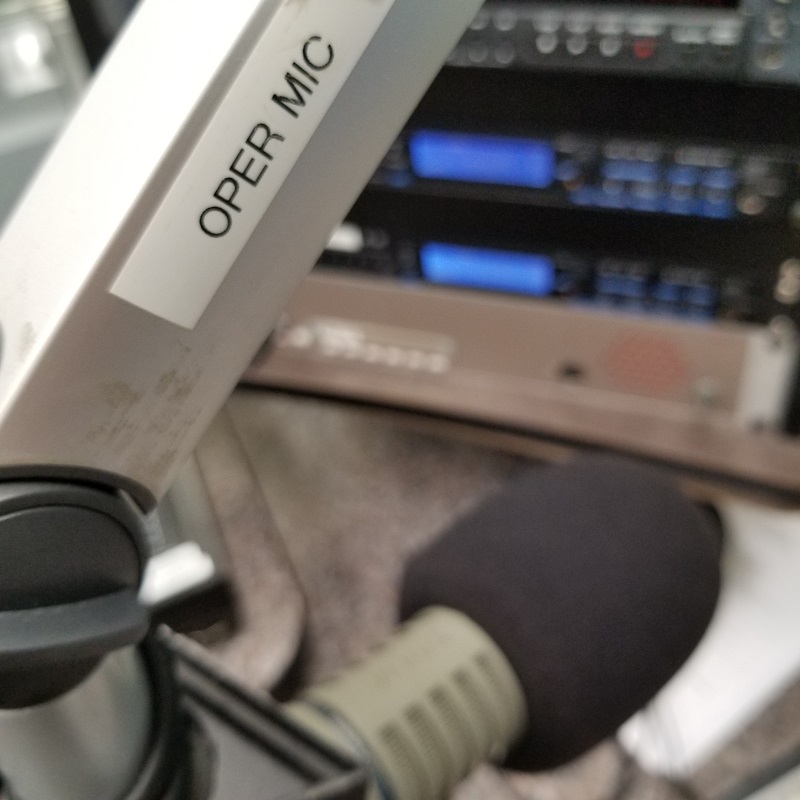
Now you should talk into the microphone. The most important thing to do is talk naturally. Think of the microphone as just another person who could only hear you if you were speaking directly into their ear from one hand-length away. It is a good idea to talk into the microphone which you are using to record. That microphone will look like this:
If you have guests, they will probably talk into the GUEST MICs. If you want the computer to hear them, make sure their faders are turned on and up on the mixing board, just as we did with the OPER MIC.
After you have said a few words (or potentially many more, if you are recording a podcast), you can press the spacebar on the computer to stop the recording.
Step Four: Editing w/ Adobe Audition
You can now use Adobe Audition to edit your audio file. A tutorial on Adobe Audition, however, is outside the scope of this article. Luckily, you don’t even have to use Adobe Audition to edit your file. You can just send your audio file to your computer and edit it with software you already have and know how to use (such as Audacity, Reaper, Sound Forge, Ableton, Adobe Audition, or any other software that edits sound). In order to do that (or anything else with your recording), follow the next steps.
Step Five: Rendering/Exporting/Bouncing/etc.
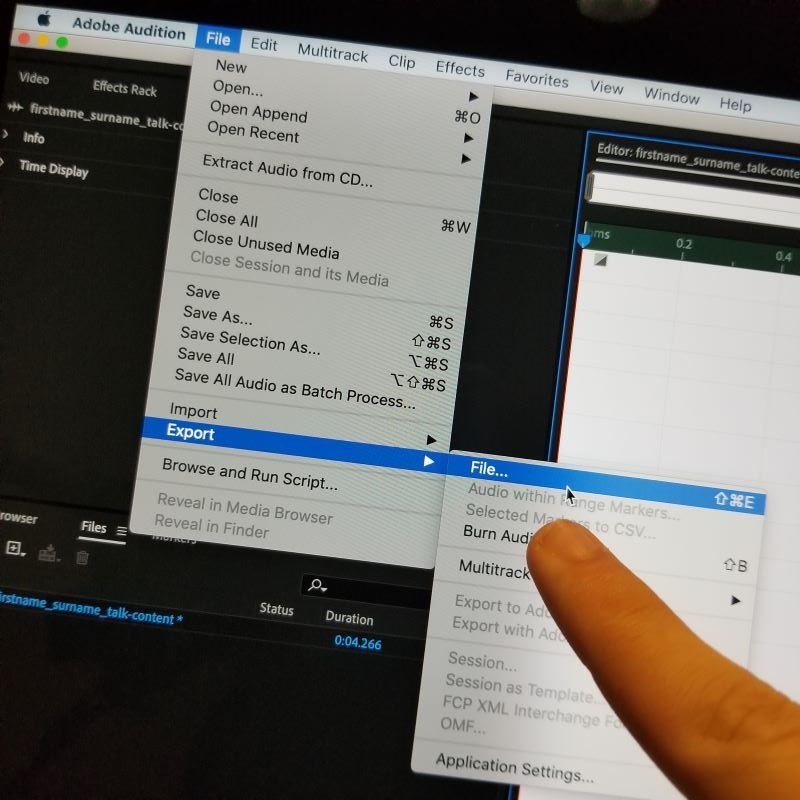
You need to get your audio out of Adobe Audition. To do that, click File>Export>File:
If the computer works, a dialog box will appear:
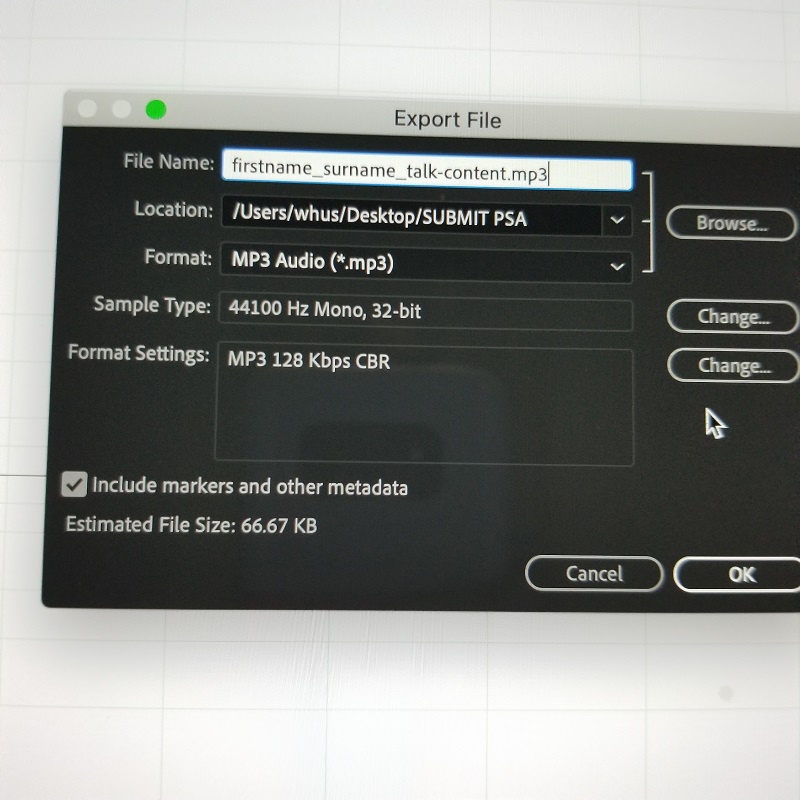
You can leave the settings as they are. If you want a higher quality, change from 128 kbps CBR to 320 kbps CBR (it is very important that you choose CBR and not VBR). For speech, 128 kbps will sound just fine, but 320 kbps will technically sound better (even if you can’t hear the difference). 320 kbps is the better option if your recording has a lot of music in it. (Unless you are editing with Adobe Audition, however, it is very unlikely that there will be music in this file (unless you brought a live band into the studio (this does not happen often))). Browse for a location that makes sense and will remain available to you (don’t put the file in a folder of images, don’t put it in a folder named after someone that isn’t you, etc.). This location really depends on what you are recording (your own podcast, a PSA, an episode of a podcast that already exists, etc.). Once you are confident that you have the location set appropriately, press OK. This will save your audio.
Step Six: Retrieving your Audio
The easiest way (in my experience) to get the file out of the studio computer and into your own computer is to e-mail it to yourself. Open up Google Chrome, sign into your e-mail, and send yourself an e-mail with your audio as an attachment. Then, on your own computer, you can open up that e-mail and download the attachment to your own computer.
Step Seven: Actually, there are only six steps in the recording process. Any further steps are up to you and depend on what your goals are.
The end.
Here are some resources that might help you with editing audio:
- Creating a PSA with Reaper
- Using EQ
- Using a Gate
- Using Compression
- Adobe Audition Tutorial (externally produced tutorial)